|
According to the Autodesk knowledge network, "The CATRig is the hierarchy that defines the CAT skeletal animation system. It is a fast, sophisticated yet flexible character rig that is designed to let you create the characters you want without having to write scripts." In basic terms this just means that 3DS has pre-made characters and models for people to use for animation and games, all they have to do is skin the character (3DS also has ore-skinned characters). I just recently started working with these rigs and so far my experience has been pretty positive, all of the pieces of the character are connected so moving the character for animations is very simple for users. This is all based through the hierarchy section which I touched on in my last post but if you didn't read it then here's the rundown, all of the objects were selected and linked together in a specific order so when the parent object is moved the childern objects automatically follow. 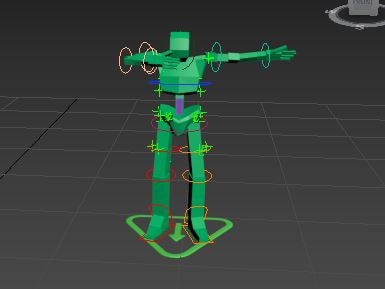 This was the Marine CATRig which had no textures and I just used the motion presets to make the rig look like it was dabbing. The whole process of creating the rig and moving it around was very simple thanks to how easy 3DS makes it for idiots like me to create cool models, 3DS provides simple bones and skeleton for users to adjust based on what they want their animation to look like. Overall CATRigs are probably one of the most important parts of games and I can't wait to work with them more in the future.
Summary:
0 Comments
Over the past couple of weeks in class, all of us students have had our heads down trying to get the final work for the quarter turned into Mr.B. All of this work that we have been doing has been focused around animation and rigging in 3DS Max. For me every class period I've had to work on these assignments have gone by like a blur because of all of the work that has to be done, I started out working on the bouncy ball project which was just to get users familiar with the curve editor and how it works alongside autokey and the timeline. We had to make an animation where the ball bounced off of three different objects as well as change directions three times. Overall I thought that the final product looked pretty good thanks to the stretch and squash that I applied to the ball before and after the frames where it would hit an object. This assignment did teach me how to work around the curve editor (as it was intended to) and it taught me some more things about the timeline and how to increase duration of the animation by working with the time configurator. The next assignment that I had to complete was simulating a game designers job, where I had to to rig a lamp for an animation, then without animating it submitting the assignment as if we were sending it to an animator. All I had to do for the project was create the dummy's that were used to move the object, apply the constraints to link the parts of the lamp together, and arrange the hierarchy so that the animators job would be as basic as just doing the keyframing. This assignment took me forever, I had to follow a written tutorial which to me is hard because I get off task very easily, and just learning the new things like constraints and figuring out the specific way that the objects had to be linked. But overall this may have been one of the most important assignments as it is simulating the real life work that game designers have to do and how they work with other people in the industry. Both of these two assignment have been very important in class teaching the basics of rigging and animations and I hope to continue work similar to this in the future.
Summary:
This quarter has felt like a complete rush in my eyes, it started out with the basics of lighting and cameras which was very small quick unit then continued on to become rigging and animations which is where the entire class is right now. When I started on the cameras and lighting unit I had been out of class for a week so I had a ton of work to catch up on so I had to put my head down and focus on the unit, overall the whole lights and cameras unit was very crucial to the basics of any game because without lights and cameras there wouldn't be any games for anyone to play (I did a previous post on the importance of lights and cameras in games). The final project of that unit was to create a demo reel of models that I have done this year and it had to be a camera moving around the model and it had to properly lit so you could demonstrate that you actually have learned something in the unit, below is the final product of my demo reel that I posted on YouTube. (Make sure to Like and Subscribe for more content like this :D) Once I was done with the lights and cameras unit it was time to move onto the final unit and most challenging unit of the year, rigging and animation in 3DS Max. Now I haven't gotten very far into the unit but I can already tell why students in higher levels of game design dread doing rigging but cause it is long and tedious. I'm on the the first assignment of the unit and I have already spent a couple of days on it (probably because I'm not very smart and get distracted easily), in the assignment we have to follow a written tutorial on learning to make a ball bounce like it does in real life primarily using the curve editor. This has been as I said a very long and tedious process because once I learned how to make the ball bounce I have to make it bounce around a room, hit three objects and change directions three different times. This has been very very challenging for me because working with the curve editor is not very easy for someone challenged like myself and it's not self-explanatory like most of the other things in 3DS. Hopefully soon this process will become second nature to me like other tool in 3DS Max but for right now it doesn't seem like it. Overall this quarter has felt like a blur and I definetly need to put my head back down and get to work on this rigging and animating.
Summary:
Recently in class we have began working with basic physical cameras and the standard lightning techniques and overall this has been one of the most important units that we have done so far. The reason that I say this unit is so important is because yo cannot have a professional looking game if the scenes aren't well lit even if it is a horror game some elements need to be well lit. Cameras may be even more important in some circumstances in games where it may be a cut scene are there are bigger elements in the back of the scene that the player needs to see like an incoming army or a ship that is flying in. One of my classmates, Nick says, "Cameras and Lights are very important in games so that players can see the characters and environment." Aidan, another one of my classmates said, "Lights and Cameras are super important in games to create the mood and tone of the level or stage." I agree with both of these statements very much as both of these are very important elements in games and necessary for a good user experience. 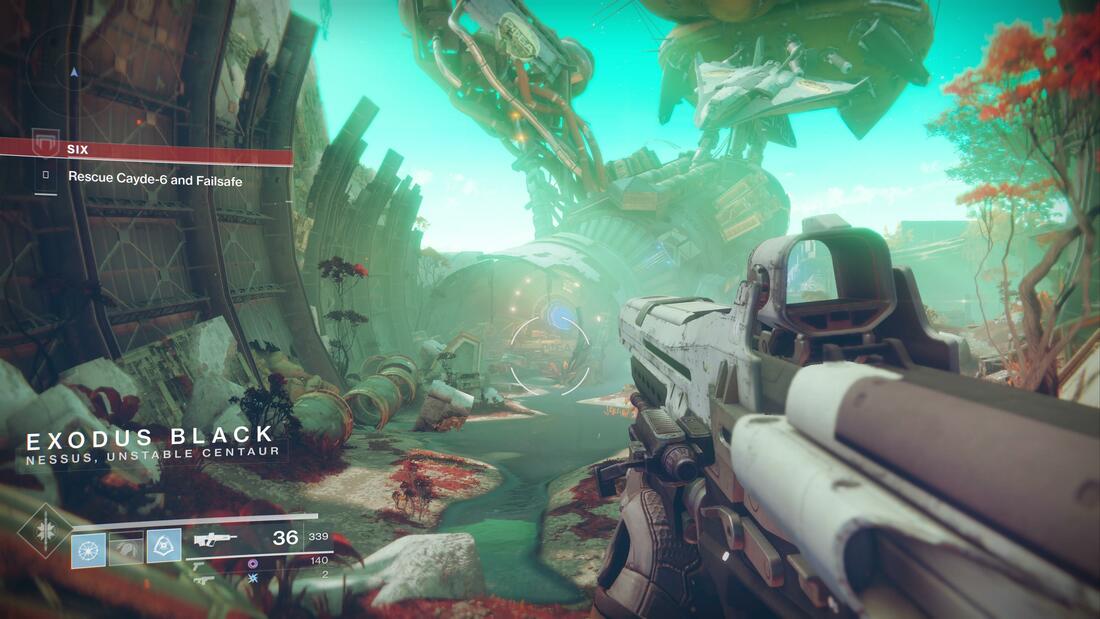 As seen in the image above the lights are playing a very pivotal role in this scene by creating an eerie tone and allowing players to clearly scene (Image from Destiny 2, Bungie, Forbes). The camera in this screenshot is playing an even bigger role by helping out the first person game-play by using a perspective camera. These are just some of the many reasons that game developers use lights and cameras to create the games we know and love.
Summary:
Over the past couple of weeks in class we have been introduced to UVW Mapping. According to Wikipedia, "UVW mapping is a mathematical technique for coordinate mapping. In computer graphics, it most commonly maps to map, in contrast to UV mapping, which maps to. The UVW mapping is suitable for painting an object's surface based on a solid texture." To me this means we are applying different Bitmaps to the objects as Standard/Sub-Object materials and making the model look like a real life object. The first assignment that we did using UVW Mapping was to create a box with Bitmaps that Mr.B gave us, this was actually quite tricky even though there was a tutorial for us to follow. The hardest part for me was using the different material editors, whether it was the slate material editor or the compact material editor, it was super confusing trying to preview the box. Another thing that was difficult for me was actually applying the images, because I first applied the UVW Map, then I would apply the Multi-Sub-Object material to it and delete some of the sides (because a box only has 6 sides), then I would have to figure out which side was which so I had to apply different colors to each side so I could differentiate them. After I had the sides figured out I had to name all of them, once I had them named and colored It was much easier. Once I had all of the sides prepared I had to apply a Standard material to each of the six sides on the box then apply the specific Bitmaps to each of the 6 Standard materials that I just applied. To me the most tricky part was changing and rotating the UVW's, sometimes when I applied the Bitmaps the Images would be turned or twisted and the image would be stretched, so I would have to adjust the settings by changing one of the U, V, or W settings, usually I would have to change the U settings to about 90, to flip the image. But after all of that was complete the box didn't look half bad, I looked like a box that I would see in a video game. To me the most interesting thing about UVW's was the ability to take your own pictures of objects and creating the object within 3DS Max. Overall UVW's seem very cool even though I haven't dove into the too much, but I sure am excited to!
Summary:
In 2018 I learned so much about 3D modeling. From things like using Blob Mesh to the uses of the Lathe modifier there were so many different tools and techniques that I learned both in class and on my own time. Lots of these techniques are things that I use even today, for example I was making a brick wall and to make it even I used the Array modifier to make it look like an actual brick wall. Another example of using a technique that I learned this past year was when I was making a fountain so I traced out the shape I liked, then applied the Lathe modifier, even then after that I used the Spherify modifier to make the fountain smooth. One of my favorite tools or modifiers that we have learned about is the TurboSmooth modifiers. TurboSmooth is a modifier that changes the amounts of faces on a primitive which make the object look more smooth when you render it. The first time that it peaked my interest was when we were creating a robot in 3DS and I randomly applied it to see what it would look like and I looked like an alien walker that looked super cool. This year has been the best modeling year of my life and I cannot wait to see where this takes me this year!
Summary:
This week in class we started to learn how to create simulations in 3DS Max. Our first assignment using simulations was to create a flag that was blowing in the wind, the first step was to create a flag poll by making a cylinder. Then we made a plane that was used as the flag, but to make the flag look realistic we had to put a bunch of segments in the plane. Then we applied the cloth modifier to the plane to give it the flowing effect. After that we had to create a group of vertices that wouldn't move, so we selected the group next to the poll and clicked preserve. After this we changed the Object Properties to silk and added the cylinder, so if the flag fell it wouldn't go through the poll. Then it was time to add wind, so we went to Space Warps, the forces and the selected wind. Once we set the direction of the wind we went back to the cloth and clicked cloth forces and selected the wind. Then once he click simulate local we got to see almost what the final product would look like. After we changed it by adding a Gravity force and changing the end frame by setting it to 100, once you click simulate it will create the video, then our first simulation was complete. This was one of the most fun topics that we looked at so far this year and I hope to continue working with simulations.
Summary:
For this blog post I'm going to talk to you about professional 3D modelers, at first it was hard to find portfolios of 3D modelers but once I found the right place I struck gold. The best one, with the most work I could find was Yoan Autin, a french modeler who had all types of models, whether it was environments, animations, or characters. One of the things I like most about Yoan's work is the attention to detail that he puts into his models,  for example this X-Wing that he modeled is incredibly detailed with all of the little things he puts through out the model (All credit to Yoan Autin). I take so much inspiration from this because it really shows how well these models can get if you just do the little things right and pay attention to every little detail in your model. Think that I can improve my personal skills before the end of the school year by taking my time with my models and making sure that I do every little thing correctly with as much detail as I can possibly include.  This was an axe that I modeled trying to simulates Yoan's modeling style.I added every specific detail, like the edge of the blade and the holes on the blade and the handle. Overall after this post I am super inspired to become a better modeler and now I know where to look for inspiration and incentive when I am modeling in the future.
Summary:
This last week in class Mr.B gave us what I thought was a pretty interesting assignment, and it was to 3D model a dinner date. So we had to model a table, candlestick, a bowl, water glass, a coffee cup with a saucer, utensils, and a napkin. This whole thing was based off of the spline tools which is where you draw a shape with the line tool, then after that you would have to convert the whole thing to an editable spline. After to had done that you could use the vertex tool to make it the exact shape you want, once you had the spline how you wanted you would add a lathe modifier to it to make it a 3D object. Once you had added that you would select the "min" alignment to make it the shape that you modeled. Once I got used to it this process was super easy and I could finish the objects in a number of minutes. Once I had everything modeled, I had to merge everything into one scene using the import function. After I had everything in one scene I had to scale everything down to a size where everything looked right and duplicate things to have it on each side of the table. This assignment I thought was pretty fun, because of the freedom that Mr.B gave us to make things like candle sticks and the table.
Summary:
www.youtube.com/watch?v=fW-JOitvRAM www.youtube.com/watch?v=QdVt__Cibic This week in class has been all about animation in 3DS Max. The first thing we did was watch a series of tutorials on animating, and teaching us about the key frames and tools in 3DS that are specifically for animating. What I got from it was that there are 100 key frames that you can use, what I learned was that whatever you do in between the key frames that you set is what changes when you play the whole thing back. We first did this with a downloaded file that Mr.B gave us of a couple cars that would go down a track. I watched the tutorial on how to change the speeds of the cars with the curve editor and that was very helpful in introducing the basics of animation. The next thing that we did was watch another tutorial on animating 5 boxes and making them rotate during the animation. This was probably the hardest part of the animation process, because I had accidentally had it on auto-key frame which was a mistake, so I had to redo it so many times. Then The last thing that we did was using our space scene that we had made in our maps activity was to make a space ship fly from Earth and off screen. I did this by setting a key frame at 1 and 100, then I placed the camera where I wanted it, and had the moon do a revolution around the earth and changed the speed to pretty high so it would rotate faster than the Earth which I also made spin. Then I started with the spaceship inside the Earth and moved it along the x-axis and pulled it out. That was pretty much all I got done this week in class and I hope to continue working with animation. Summary:
knowledge.autodesk.com/support/3ds-max/learn-explore/caas/CloudHelp/cloudhelp/2016/ENU/3DSMax/files/GUID-FC0BE460-9BA8-4221-AEA6-ACB6ECA4AE9B-htm.html app.schoology.com/assignment/1558220173/info The Space Video I Made: |
