|
So I'm back again for my second summer assignment blog post. When I was reading the guidelines for this assignment I realized that I had never really tried any pure audio based editing software. When I say that I mean I have worked in Premier pro where I've had to trim audio and cut it, but never anything like Audacity which is what I decided to try. Now I went into this completely blind and lucky for me everything on the user interface is super simplistic so if I can figure it out on my own I'm pretty sure anybody could. So the main tools are in the top left of the program, pause, play, stop, skip to beginning, skip to end, and most important record (there are some other tools to he right of that but I will over those later). These tools are your best friend so going through each of them one by one, the pause button will pause your recording instantly and if you press record again after it was paused it will pick up right where you left off. The play button is mostly for listening to your audio after it has been recorded. The skip buttons are for after it has been recorded you can either skip to the beginning or the end of the audio track. Finally, the record button is for starting and stopping your recording if you are using a microphone. Another thing that I found out was if you record a second audio track it will go at the same time as the first one similar to the different audio channels in Premier. This is useful for a song producer if they wanted to import the beat to a song and have the lyrics go over the beat. Now there weer some little tools to the right of the big ones but the only one that I found really useful was the selection tool that would allow you to highlight a part of the audio track. The other tools that I mentioned before are the cut, copy and paste tools which can take bits of the track and allow you to move them around through the audio channels. So once I started recording audio bits, I found myself adjusting the volume of those track by the designated volume slider to the left of the track and it let me find a good balance between the track so that one wasn't overpowering the other. Overall, I found that Audacity was super simple to use and I actually really enjoyed making fun little song with it, I would definitely recommend it to people who want to get into music or audio production as it's free and super simple to get into.
Summary:
0 Comments
For my final summer assignment in the game design pathway, Mr.B has asked us to download at least one free software and I chose a video editing software from Adobe called Premier Rush. Now I am someone who has been fortunate enough to have the full version of Premier Pro and I am quite surprised by the similarity between the two. The user interface looks kind of like a watered down version of Premier Pro while still having some of the same tools like cut, duplicate, and delete. It has a timeline on the bottom that in the beginning that is very simple but users can expand it to show the different channels like in Premier Pro. To me the app isn't very useful but i can totally see the audience that Rush is made for, like beginning film makers who are balling on a budget and want to have a software that is more advanced than iMovie. One thing that I actually really like about Rush is the templates that Adobe gives you, where you can add in multiple transitions that aren't on Premier Pro or you can add cool looking text that already has a transition applied. Another this that is really emphasized is sharing to social media, after you have finished your project it gives you the option to upload directly to YouTube or Instagram. Overall the app is great for the people who want a Premiere Pro like experience but may not have access to a powerful computer for processing, and Rush is a great substitute for just that.
Summary:
For one of the last parts of my summer assignment I've been asked to make a blog post on the upcoming school year. Honestly I'm really excited for this year in class, I'm taking Game Art Design, the class where we finally get to create video games like we were promised years ago. In the past years we just worked with programs that video game companies use but not as much as the ones that I think we will be getting to this year. I'm also excited to learn to code, I've only ever dabbled in it in the past but this year I think we will dive right into it. Since all the programs that we will be working in this year are new to us I think that this upcoming class will be my hardest in the Game Design pathway to date. To be honest with you I'm not really sure what programs we will be using in class but Mr.B has mentioned Unity so I expect that but other than Unity I'm pretty much diving in blind. While summer was fun, I am ready to get back into the swing of things with school and I can't be more excited to begin Game Design with my friends!
Summary:
Larger models such as fields or mountains were never something that we touched on last year in class, so I decided to explore it for one of my summer assignment post's. I found a couple of tutorials online that talked about how to model large scale environments so I decided to see what they were all about. All of the tutorials seemed to say they same thing, that the terrain was absolutely the most important part and the easiest way to create a good terrain would be to start with a plane and apply the TurboSmooth Modifier. This image is not mine it belongs to the tutorial and the creator, I'm just showing what they did Then once it had all of the vertices, you can move it around to make it look like a landscape. Then they said once you have the terrain that you like you place in placeholder geometry which are used to represent where your houses and buildings would be in the final scene, for example like where your houses would be in a neighborhood. The next step would be to create a camera and place it where you think the rendering will look good. This was the part I found interesting, the modeler split up the terrain, so some parts of it would be showing and the parts that weren't showing where deleted, so the camera wouldn't see anything different. Then the person who was creating the model added bit maps to the terrain which I've covered in a previous blog post during the school year so I don't need to explain how to do that. Then once that was finished the modeler randomly placed trees using Scatter which made it look like an actual forest when the rendering was finally done. Then finally he placed in things from a downloadable pack like grass and a boardwalk with lights and rendered it all. Once it was finished the rendering looked amazing, I think that the bit maps that he added made a huge difference between just a regular model and this insane piece of art. I hope to do something like this in the future for an assignment.
Summary:
One of the biggest parts of photographers jobs isn't just taking the photos, they also have to edit them to their or their clients liking. One of the easiest ways to edit a photograph is to adjust the levels of the picture, that's what I'm here to explore today. Level adjusting allows the users to change where the brightest and darkest pixels are in a photo, this means that you can control the over shade of the picture whether you want it to be lighter or darker. The easiest way to adjust the levels is using the Level Slider in programs like GIMP (which is what I use and what I will be referring to) and Photoshop. In GIMP there are three parts of the Levels tool, Input Levels, Output Levels, and Auto Pick Levels. Input Levels shows where the darkest and lightest pixels are in the image and lets you use a slider to adjust where you'd like them to be. Output Levels control the range of levels in your final image. Finally the Auto Pick Levels Lets you manually drop in points to adjust you image. To demonstrate this technique I searched for poorly lit photos on Google and came up with a street with few lights. I brought the picture into GIMP and started to adjust the levels, I started with the Input Values, moving the middle slider closer to the left which made the picture slightly brighter. Then I moved the right slider closer to the left which darkened what I had done before but it was still brighter than what I started with. Then I moved down to the Output Values and only moved the left slider to the right which made the picture slightly brighter. Then I was finished and pretty pleased with the outcome. This skill seems very important for photo producers, so they can make final tweaks or pictures that they have taken and make them look better than before. This Was Before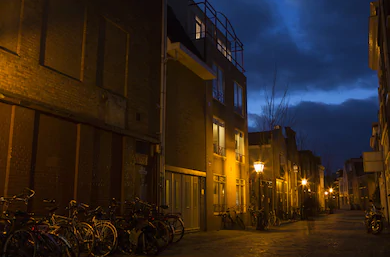 This Was After Summary:
|
